Thursday 6 January 2011

Making eyes POP!

The eyes are such a powerful communicative tool that if they aren't sharp in an image those files are only good for one thing, the trash (or the file designates arty nonsense). If the eyes in a portrait shot are share there is a quick and easy method to make them pop that little bit more and add a little more oomph to your image. The trick that follows isn't good for every image and results vary depending on eye colour and lighting but used judiciously can really add something.


The first thing we need to do after we have opened the image in Photoshop (I do most of my B+W conversions in Lightroom now) is create a new empty layer (Ctrl + Shift + Alt + N or Ctrl + Shift + Opt + N) or if you cannot mash that many keys at one time select new layer from the layers panel.
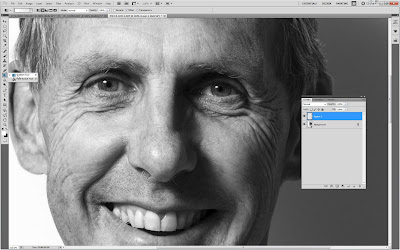


With this new layer active zoom (Z) into the image so both eyes take up most of the screen and select the gradient tool (G). (This is where a huge monitor comes in handy.)


Now we need to select the radial gradient from the Options bar. If you cannot see the Options bar check Options in the Window menu.
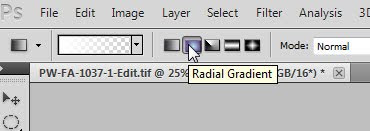


And Foreground to transparent in the Gradient picker.


We need a white foreground colour and the easiest way to do this is press D to return to the default colours, Black foreground and White Background. Now press X to swap foreground and background colours.


Now carefully drag a line from the centre of the iris to the edge on each eye.
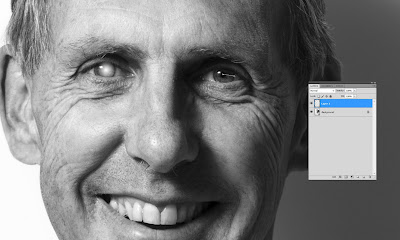


Clean up each circle using the eraser tool (E) so that the gradient is on the eye ball only, ie erase any white on the eyelid or lashes. You need a medium hard edge brush. A great way to change brush size is to hold down Alt (Opt on a Mac) and right click. A red circle appears and dragging left and right changes size while up and down alters the hardness of the brush.
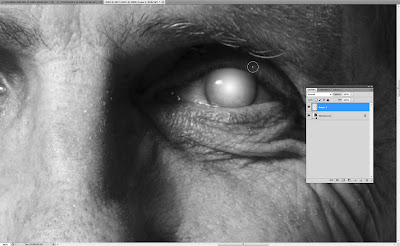


Once this is done change the blend mode of this layer to Overlay and BOOM! your eyes will pop.

If the effect is too strong you can always turn down the opacity of this layer to get the result you require. Very light blue eyes look a little freakish in my experience and dark eyes have little effect but it does depend on the original lighting in the image.
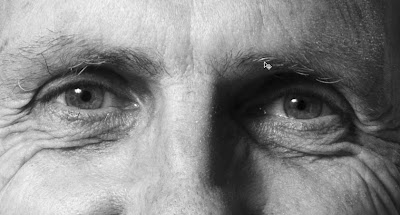
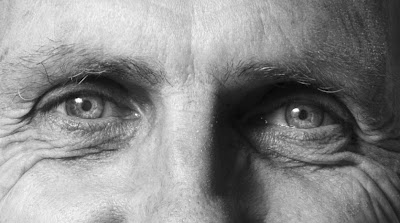


Cheers
Craig

Read more...

Tuesday 26 October 2010

What did you do on the weekend?


We went and shot this sea stack on the south coast of Tasmania, an amazing feature about 4 meters wide and 60 meters tall. Quite an epic adventure with big packs full of glass and rope to make the images possible. It was a long and cold day despite the blue skies in the picture, with the wind blowing 30 knots straight from Antarctica. But for all the hardship the images were worth it. Such a great day with some amazing people. Sometimes photography is all about the images. Sometimes it is about the adventure as well.

PS the stack is so big and the vantage points so few this image is actually a stitched vertical panorama of 22 images shot while hanging in space above the sea. This is so we could see that it is a detached pillar and fit the while thing in one frame.
Read more...

Sunday 10 October 2010

Broome Bird Observatory Workshop 2010

Just got back form the Broome Bird Observatory where we held another great workshop. The days were long and hot but everyone was keen and we all had a great time. We also got a few great images. Although I spend most of my time at the workshops helping the participants I still tote a camera along and manage to snap off a few frames here and there and as promised here are a few of my images from the trip.

(Above) A very agreeable Eastern Reef Egret
I always shoot in burst mode to try to get the best head angle with the sun at my back to get a nice catch-light in the birds eye.

We had a few close encounters everyday including this one with a family of Broad Billed Whistlers. Three displayed for us for quite a while before we headed into the mangroves.

Ruddy Turnstones in flight

Although the numbers of large flocks were down from last year there was still plenty to shoot with loads of action from the bush birds as well as on the beaches.


Sharp-Tailed Sandpiper
Getting down low makes it easier to approach subjects as well as giving a great out of focus background to help make subjects 'POP'.

We are in the process of sorting dates for 2010 at the moment so send me an email if you are keen to come along next year. I cannot wait to head back!
Read more...

Thursday 29 October 2009

Panoramic and High Dynamic Range Workshop


We have had numerous requests to run specific Panoramic and High Dynamic Range Imagery workshops and now we have a time and date for the course. Mark it in your diaries, December 5th. This is a one day workshop located in the Adelaide City Centre. We will spend the morning shooting the streets of Adelaide and after lunch will hit up the gallery space as Photographic Wholesalers to learn how to put all those shots together. This is a jam-packed photo extravaganza with loads of hands on tutorials in the field as well as in the digital darkroom on how to get those images to blend together seamlessly. Demystifying the processes for both HDR and Panos we will also have the expert knowledge of the PWs staff on hand to help with any equipment related questions. For more details and how to book head along to www.craigingramphoto.com.au/workshops

Hope to see you there

Craig

Read more...

Wednesday 28 October 2009

Broome Birds Workshop - Participants Images


Just a quick post to showcase some of the great images taken by the folks who came up to Broome with me last month. Check em out here. These are just a few of the many fantastic images that were captured during the week. Everyone walked away with some fantastic shots and all who attended should be super pleased with their work, we all know how hard they did work for some of those shots.

And a quick plug for tomorrow, stay tuned for some exciting news for Adelaide folk being announced tomorrow. A bit later than promised but tomorrow for sure!

Read more...

Thursday 8 October 2009

APSCON 2009 Presentation


Had a great day down at the Australian Photographic Society's Annual Convention today. I spoke at the event on adventure sports photography, the hows and the whys of shooting extreme sports and had a great time. Met a load of nice people that were all just so keen on photography and although none in the audience were inclined on shooting sports on the edge (I don't think), everyone was keen on seeing and sharing there photography. These sorts of events always impress me with how much photography people can handle.

We talked about lighting, equipment, composition, techniques, pretty much everything all crammed into one hour. I could have talked for way longer than that(and shown a bunch more images) and the audience would have lapped it up. Not that I think my talk was that inspiring it is just the audiences enthusiasm for photography was insatiable. I always enjoy giving talks at these events for that exact reason, everyone is keen, friendly and willing to learn and to share ideas.

If you were one of the many folk down there thanks for putting up with my jokes and hello to all those who came and had a chat afterwards. It was great to meet you all and hope to see you again either at one of the many club talks or even out shooting one day. Maybe I encouraged a few folk to try something a little different with there photography;-)
Read more...

Wednesday 7 October 2009

Traveling with photography gear


We didn't get a chance to blog every day from the Broome workshop as we were out of mobile range for the majority of the trip. So to make up for it I am going to run a few posts over the next few days relating to the experiences we had on the trip. To start with a brief post about travelling with camera gear. This is one of the most asked about questions at the moment with airlines cracking down on baggage allowances all over the place.

The first thing I do is try to drive. This way I can carry as much gear as I want including loads of spares and "what if" equipment. When driving I usually take two camera bags packed full of gear and at least two tripods. Then I have all the equipment I could possible imagine.

If the drive is too long which means more than 8 hours, then flying makes more sense. When flying I take only what I need for the job with a spare body (total of 3 bodies) and take it all as carry on. This normally fits inside my Think Tank Photo Airport Addicted backpack (See above). If I need a little more room for longer projects then I take on the slightly oversized Airport Security. Inside these bags I pack all of the gear needed to get me on the ground running so everything from laptops to batteries and chargers. No point having a bunch of cameras with no power. Tripods have to get checked but everything else comes in the cabin with me.

This came up on the course as on participant landed and his checked baggage did not. He had some of his camera gear with him but no chargers for his phone, laptop and cameras and a few lenses still in transit somewhere or even worse in the trunk of someone else's car! Things turned out okay in the end with his gear turning up the next day but it does go to show that you want all or your gear on your person at all times so you can hit the ground running when you arrive at your destination.

Now all this metal and glass will take you over the stated weight of seven kilograms but there are ways and means to get around this. The first way is to not get checked. I have only been checked once so far but it will happen again one day and if you know the rules though you can get around them. You are allowed one bag of seven kilos, a laptop which can be in a separate bag, a camera and they don't weigh you. I usually travel in a pair of trousers with large pockets, large enough to accommodate a 70-200 f2.8 and another lens in the pockets. If they are weighing peoples carry-on at the check-in take a couple of lenses out of the bag stick them in your pockets. Place all chargers and cables in with the laptop and sling the camera over your shoulder and instantly you have lost a pile of weight from your check-in bag. On the one occasion I had my carry-on weighed I did this in front of the attendant and was allowed aboard. Strange but they allow it. Probably not worth the argument most of the time.

Most of the time though getting to the airport early, a jovial smile and a joyful disposition is enough to get you through. And remember they are just doing their job and just because you are a photographer the same rules still apply. If you are forced to check your gear you have to take it on the chin, fork up the cash and hope your gear arrives in one piece.

The last option is to freight your gear there ahead of time. I am doing this more and more with spare equipment and large lenses as time allows. Sometimes back to back jobs don't allow this but I can take the minimum equipment onbaord and know the rest will be on location when I get there.

Happy Snapping

Craig


Read more...