
We have had numerous requests to run specific Panoramic and High Dynamic Range Imagery workshops and now we have a time and date for the course. Mark it in your diaries, December 5th. This is a one day workshop located in the Adelaide City Centre. We will spend the morning shooting the streets of Adelaide and after lunch will hit up the gallery space as Photographic Wholesalers to learn how to put all those shots together. This is a jam-packed photo extravaganza with loads of hands on tutorials in the field as well as in the digital darkroom on how to get those images to blend together seamlessly. Demystifying the processes for both HDR and Panos we will also have the expert knowledge of the PWs staff on hand to help with any equipment related questions. For more details and how to book head along to www.craigingramphoto.com.au/workshops
Hope to see you there
Craig
Read more...
Thursday, 29 October 2009
Panoramic and High Dynamic Range Workshop
Wednesday, 28 October 2009
Broome Birds Workshop - Participants Images

Just a quick post to showcase some of the great images taken by the folks who came up to Broome with me last month. Check em out here. These are just a few of the many fantastic images that were captured during the week. Everyone walked away with some fantastic shots and all who attended should be super pleased with their work, we all know how hard they did work for some of those shots.
And a quick plug for tomorrow, stay tuned for some exciting news for Adelaide folk being announced tomorrow. A bit later than promised but tomorrow for sure!
Read more...
Thursday, 8 October 2009
APSCON 2009 Presentation

Had a great day down at the Australian Photographic Society's Annual Convention today. I spoke at the event on adventure sports photography, the hows and the whys of shooting extreme sports and had a great time. Met a load of nice people that were all just so keen on photography and although none in the audience were inclined on shooting sports on the edge (I don't think), everyone was keen on seeing and sharing there photography. These sorts of events always impress me with how much photography people can handle.
We talked about lighting, equipment, composition, techniques, pretty much everything all crammed into one hour. I could have talked for way longer than that(and shown a bunch more images) and the audience would have lapped it up. Not that I think my talk was that inspiring it is just the audiences enthusiasm for photography was insatiable. I always enjoy giving talks at these events for that exact reason, everyone is keen, friendly and willing to learn and to share ideas.
If you were one of the many folk down there thanks for putting up with my jokes and hello to all those who came and had a chat afterwards. It was great to meet you all and hope to see you again either at one of the many club talks or even out shooting one day. Maybe I encouraged a few folk to try something a little different with there photography;-)
Read more...
Wednesday, 7 October 2009
Traveling with photography gear

We didn't get a chance to blog every day from the Broome workshop as we were out of mobile range for the majority of the trip. So to make up for it I am going to run a few posts over the next few days relating to the experiences we had on the trip. To start with a brief post about travelling with camera gear. This is one of the most asked about questions at the moment with airlines cracking down on baggage allowances all over the place.
The first thing I do is try to drive. This way I can carry as much gear as I want including loads of spares and "what if" equipment. When driving I usually take two camera bags packed full of gear and at least two tripods. Then I have all the equipment I could possible imagine.
If the drive is too long which means more than 8 hours, then flying makes more sense. When flying I take only what I need for the job with a spare body (total of 3 bodies) and take it all as carry on. This normally fits inside my Think Tank Photo Airport Addicted backpack (See above). If I need a little more room for longer projects then I take on the slightly oversized Airport Security. Inside these bags I pack all of the gear needed to get me on the ground running so everything from laptops to batteries and chargers. No point having a bunch of cameras with no power. Tripods have to get checked but everything else comes in the cabin with me.
This came up on the course as on participant landed and his checked baggage did not. He had some of his camera gear with him but no chargers for his phone, laptop and cameras and a few lenses still in transit somewhere or even worse in the trunk of someone else's car! Things turned out okay in the end with his gear turning up the next day but it does go to show that you want all or your gear on your person at all times so you can hit the ground running when you arrive at your destination.
Now all this metal and glass will take you over the stated weight of seven kilograms but there are ways and means to get around this. The first way is to not get checked. I have only been checked once so far but it will happen again one day and if you know the rules though you can get around them. You are allowed one bag of seven kilos, a laptop which can be in a separate bag, a camera and they don't weigh you. I usually travel in a pair of trousers with large pockets, large enough to accommodate a 70-200 f2.8 and another lens in the pockets. If they are weighing peoples carry-on at the check-in take a couple of lenses out of the bag stick them in your pockets. Place all chargers and cables in with the laptop and sling the camera over your shoulder and instantly you have lost a pile of weight from your check-in bag. On the one occasion I had my carry-on weighed I did this in front of the attendant and was allowed aboard. Strange but they allow it. Probably not worth the argument most of the time.
Most of the time though getting to the airport early, a jovial smile and a joyful disposition is enough to get you through. And remember they are just doing their job and just because you are a photographer the same rules still apply. If you are forced to check your gear you have to take it on the chin, fork up the cash and hope your gear arrives in one piece.
The last option is to freight your gear there ahead of time. I am doing this more and more with spare equipment and large lenses as time allows. Sometimes back to back jobs don't allow this but I can take the minimum equipment onbaord and know the rest will be on location when I get there.
Happy Snapping
Craig
Read more...
Thursday, 24 September 2009
Freshening up your photography

Keeping your photography fresh is an important and sometimes difficult thing to do. Looking back at your images and finding that you are thinking the same image over and over again even though the locations may be different is a disheartening thing. As are those days that you struggle to make any pleasing images at all, trying your hardest to make a few good clicks but nothing works. My favourite way to get over these slumps (we all have them) is to shoot something different or something that you shoot often but in a different style. I took this idea to one of my editors. I wanted to shoot an article for the magazine that stood out from the rest and indeed it did. It was for a rock climbing magazine and we decided to look at the people that made the sport rather than people doing the sport. We chose a busy weekend and set up an outdoor studio at a popular climbing venue and shot a bunch of people and turned it into an eight page photo essay that went down a treat. So much so it is now back as a regular feature looking at some of the figures that made the sport what it is today (See image above). This has refreshed my creative spirit, opened me up to shoot people again (when there aren't moving at 100km/hr), made an impact with readers and editors alike and has been a great opportunity to meet some interesting folk. And it is all just about what we love doing, getting out and taking photos!
Read more...
Tuesday, 22 September 2009
Photography In The Fast Lane

Well it is spring again and we are flat out, so flat out in fact, I cannot remember the last time I manage to post here on the blog. I am hoping to change that over the next few weeks with a few posts on some exciting up and coming projects. We are off to WA in a few days for some great photo opps as well as the 2009 Broome Bird Observatory Field workshop where we hope to blog every day to show you what goes on during the workshop. The I am presenting at APSCON in Victor Harbour on the 8th of Oct. This is a talk on shooting Adventure Sports so come along and say hi. If you want a bit more incite on shooting extreme sports next up we have two commercial shoots in Victoria shooting some of Australia's best extreme athletes and we hope to show you what goes on during such a shoot. I have also lined up a few articles that will be posted on the blog to help you out with a few basic ideas that give folk a bit of trouble when shooting digital. So stay tuned as we hope to liven things up over the next few weeks.
Happy shooting
Craig
Read more...
Wednesday, 26 August 2009
Your favourite lens (and focal length)
After the last post I was intrigued as to what my 'favourite' lens is. My favourite lens would have to be a toss up between the 14-24mm f2.8, the 24mm PC-E or the 600mm f4. All these lenses allow me to create images that no other optic can. But what I was interested in was how many images are taken with these lenses. All are very specific tools, not everyday lenses but exotic optics used for specific purposes. I did a bit of digging and found a great tool that can search my Lightoom catalogue and reports back with some interesting info
Image Reporter analyses metadata in a Lightroom catalogue and reports on cropping, camera makes and models, lenses, average focal length, ISO, and more. Information it reports is astounding. Here are a few examples form my catalogue.
- My most used lens is the 600mm followed by the 24-120, 24-70, 12-24 and 14-24 all in similar numbers. This is interesting that all these have a 24 in the number. After the 6 200mm lenses I use I regularly use 5 24mm lenses.
- The average focal length of the 600 is 918, this is due to the fact that I am normally shooting with the 1.4 or the 1.7
- TC. The average focal length of the 70-200 is 134mm. This shows that I am using both ends of the lens equally not like the 80-400 at 328mm, which show I am spending more time closer to 400mm.
- The average of crop of all images in the library are 100% and of the images that are cropped the average crop is 85%.
Image Reporter
Read more...
Thursday, 20 August 2009
Too many two hundreds
Packing for two trips at the moment (workshop this weekend then a quick turnaround for a trip up north on Monday) and came across the usual what to pack dilemma. While sorting the gear I was surprised at how many 200mm lenses I use. I wouldn't have thought 200 would be a favourite of mine but it appears so. Click read more for the full list.
70-200 2.8 the standard tele zoom
200mm micro, the killer macro lens
70-300 VR a great flight lens, so light, so cheep
80-400 VR a very versatile light weight option
200-400 VR awesome for so many situations
200 f2 not just for low light
I still don't think that 200mm is my most used focal length but it is interesting to see where all these fit into creating images. MTK next week.
Read more...
Tuesday, 11 August 2009
Fave's from the photowalk

Here are a few of my favourite images from the walkers submitted images. Can you guess the winner if you don't already know? (and can you guess the runner up? It was a close run thing). Click read more to see some other faves.

Here are a few of my favourite images from the walkers submitted images. Can you guess the winner if you don't already know? (and can you guess the runner up? It was a close run thing). Click read more to see some other faves.


Read more...
Thursday, 6 August 2009
Adelaide Photowalk 09

It has been a while between posts here on the blog but things have been hectic and I am only just catching up. To start with just a quick follow up on the photowalk. We had a great turn up and some great weather (especially when you consider what the weather was like the previous week.) We started out with 45 folk and I think about 20 made it the full length of the walk with some getting led astray nearly straight away! Everyone was super keen and we all (I think) had a great time.
Most of the folk who came along ended up submitting some images and I spent quite a while considering what was my favourite. It was such a had job with so many great images and all of very different styles. The image I ended up choosing was not one that many of those who know me would have thought would be my cup of tea. Perhaps that is why it was chosen? It is a strong manipulated image but it works on many levels and after much consideration it won out, but there were many great images and the most important thing is that we all had a good time. I sure did and hope to see you all again for the next photowalk.
I am thinking about running another walk in the summer, same idea but with out the backing of Scott Kelby and co. If you are interested in coming along then drop me a line/comment/email etc and if we get enough interest then we will sort it out!
Read more...
Saturday, 18 July 2009
Photo walk fun

To all that came on the walk today, thanks for coming and making the day great. To all that didn't make it, well there is always next year and we might look at running another in the summer as well. That's summer in the southern hemisphere ;)
More to come when I get back
Cheers
Craig
Read more...
World Wide Photo Walk toady
Just to let you know we are running the World Wide Photowalk toady and have had a couple of folk withdraw so if you are in Adelaide and are keen to come along today then quickly head over to http://worldwidephotowalk.com/adelaide-sa-au/ to sign up. Hope to see you at 3.
Cheers
Craig
Read more...
Wednesday, 27 May 2009
Monday, 25 May 2009
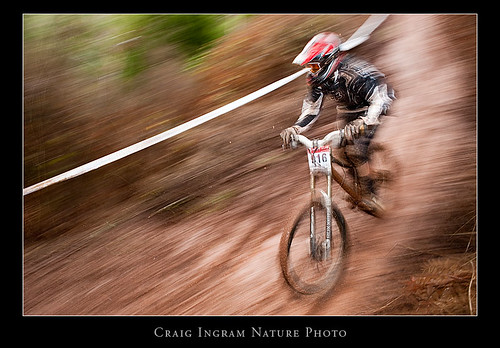
Flat out in the mud - or more photography in horrible conditions
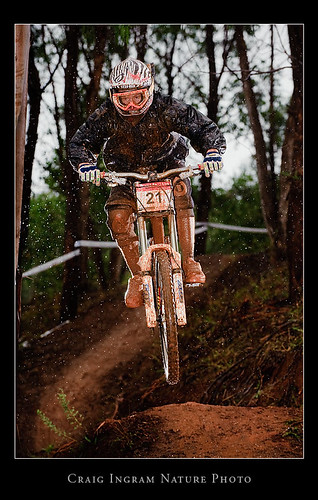
If there has been one thing that has been testing me recently it is the weather. If a weekend of 10m swells 30 knot gusts and the salt spray associate with both wasn't enough to test me and my equipment to the limit how about a day of constant rain, slick mud and riders bombing down hill at speeds of over 60kmph. That was the case for the SA State Downhill Mountain Biking race at Mt Fox at the weekend. I have been shooting this series for a national mag this year and been having a blast. Though the conditions were less than perfect we still managed to grab a few good images and as always I learnt a few things while I was out.
1. These guys (and girls) are mad. Actually I already knew this but seeing them in the wet reaffirmed my earlier conclusion.
2. Your camera can put up with a lot more grief than you can imagine. After the last few weeks and no camera fatalities I am impressed with the quality of cameras today, even those that are not billed as weather sealed.
3. Be careful when shooting with a hot shoe mounted flash as this exposes the connection to water ingress. Nothing a bit of gaffer tape won't seal.
4. Another use for clear shower caps (the ones you get in motel rooms) is to cover you strobes. Whack it over the whole unit and you have a raincoat for you flash that it can fire straight through!
5. Back lighting lights up rain beautifully.
6. You can get out and grab some great photographs in almost any weather. (again Sunday just reaffirmed my previous knowledge.)
7. Cameras are harder to clean than mountain bikes, you cannot just hose you camera down after a day in the mud like you do with your bike.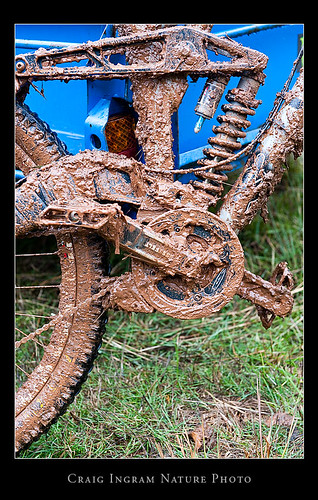
So get out and shoot!
Read more...
Thursday, 21 May 2009
World Wide Photo Walk

We are hitting the streets of Adelaide on the 18th of July to take part in the World Wide Photo Walk. This is going to be a great day with loads of photogs joining in to see what we can find and photograph. This is a great chance to meet up with like minded people, get out and share the passion we all have for photography. I am to lead the Adelaide group, now all I have to do is decide on a location. If you have any ideas/preferences let me know via the comments or email and lets get this happening. If you want to sign up, and why wouldn't you click on the picture above and if you are not in Adelaide then click here to find a Photo Walk in your area.
Hope to see you there!
Read more...
Wednesday, 20 May 2009
Great Ocean Road Landscape Photography Workshop

Just back from a great trip down the Great Ocean Road with 10 of the nicest, keenest folk you could imagine. We had some amazing weather with waves crashing over the 45meter cliffs of Loch Ard Gorge, some fabulous light and the rain holding off long enough for us all to get out and get some great images.
On the first evening we had dinner and saw a short slide show of what we were hoping to achieve over the weekend before an early night, well the earliest for the weekend anyway. The following days the sun didn't greet us for our sunrise shoot but the weather did with some of the most amazing scenes I have ever witnessed along that stretch of coast. A king tide, with 10m swells and onshore gusts up to 30 knots lead to some fabulous images of the power of the sea. The sun did manage to find its way through the clouds on occasion to light up the cliffs, setting them off against the dark clouds in the background. We had planned to visit Gibson's Steps in the evening but the king tide put paid to that so we bustled with the crowd at the 12 Apostles. No glorious sunsets but we came to see the might of the Southern Ocean and we got what we paid for. Not at all surprising that there are fewer Apostles after seeing what that ocean can do.
The third day found us once again exploring Loch Ard Gorge, one of the most spectacular sections of the Great Ocean Road before heading off for lunch and a trip to the Otway Ranges and try our luck shooting waterfalls. They are called Rain Forests for a reason but after huddling in the car park for five minutes sheltering from the rain we trooped off down to Hopetoun Falls where some of the best images of the trip were found. We again battled the elements but this time we had the added advantage of fresh water spray over the salt spray of the previous sessions. Sunday evening was finished up with some fantastic pizza and red wine huddled around the laptops working on the days images with the talent of the group really coming to the fore.
Still not photographed out the group payed one last visit to the coast on the Monday morning to find the seas eerily calm after the previous few days. We visited a couple more sites along the coast heading back, late, to the apartments because we just couldn't get enough. After a quick edit we grabbed lunch and went back to for a slide show of the participants images and I have to say I was amazed with the quality of the work produced over the weekend. I would be happy to have many of the images shown in my collection. Peoples skills came on in so many ways over the weekend from technical, camera and computer craft to seeing and composing images. And the end result was some amazing photography.
Overall the trip was a great success and I hope everyone had as much fun as I did. The weather wasn't quite what we expected but I never once heard anyone complaining about it and everyone came home with fantastic images, some great memories and some new friends.
Read more...
Tuesday, 5 May 2009
Autmunal Workshops

Four workshops down and one to go for the Autumn and what a fun time it has been. Over the last two months we have been to a ton of different locations, made loads of new friends and just had a great time sharing photography with people. The last workshop for this utumn is going to be the best of the year so far so read on for more details...
The last workshop for the season is a four day trip along The Great Ocean Road. We will shoot some of the most dramatic coast scenery in Australia and explore the Otway Ranges. This is a workshop for the dedicated landscape photographer looking at advancing their photographic vision and skills. Taking the classroom into the field we will look at how to tame the vast contrast range that make shooting below the forest canopy difficult. How to maximise depth of field to create stunningly sharp images from foreground to infinity and seeing and shooting for black and white.
There are two places left on the course and we have great rates for non-participant partners. For more info and booking online click here
Read more...
Thursday, 30 April 2009
Travelling as a Photographer

Travelling as a photographer is always difficult. These days one of the most difficult ways to travel is by air. You can read about how I avoid some of the problems associated with air travel in the April issue of Australian Photography Magazine (09).
With these increased difficulties of travelling with large amounts of photography equipment I prefer to travel by road if possible. No queues, no weight limits and no excess baggage. The only thing you do have to be aware of is time. On a plane you board the plane and then you get there. When driving you are your own captain and as a photographer if the light is good you are going to want to stop on route.
This is best described by my own recent record of six and a half hours to make a three hour drive. So make sure when you are preparing for your next trip to pack a few extra hours travel time so you can grab a few shots on the way.
Read more...
Thursday, 23 April 2009
Software recommendations for nature photographers
I am often asked what software I use in the digital darkroom and the answer is loads. I use a bunch of different tools to get the job done, using whatever tool will best do the job. Much like lenses. You wouldn't just use one lens for every shooting possibility though with fantastic super zoom lenses like the 18-200 we are getting closer! What follows is a list of what I use to get he job done...
Digital Pro
This is my program of choice for reviewing, editing (deleting) and filing my images. I need to quickly store hundreds of images from a shoot with the ability to easily find them again when clients need them. DP is the best program I have found so far that does this. It is fast, has an auto renaming function that cannot be beaten and can talk directly with other editing applications to speed up the workflow.
Adobe Photoshop Lightroom
This is where I spend most of my time optimising my images. For the majority of my images I just apply contrast, colour and tonal edits and LR does a great job. It is fast, efficient and user friendly. It is non-destructive, has some database functions and great printing and web gallery options. It cannot do direct pixels editing but does 90% of what I need to do to all of my images.
Adobe Photoshop CS4
When there is something I cannot do in Lightroom then I reach for Photoshop. Image blending and panoramic stitching PS has the power to do far more than LR will ever be able to manage. I am using PS less and less but it is still a valuable tool for image editing. The new adjustments panel, GPU acceleration and the new mask panel make the upgrade worth it. Even better is the native 64 bit version allowing for loads more RAM for PS to access. Stitching and working with huge images just got faster.
Photoshop Plugins
I prefer to spend my time in the field shooting rather than in front of the computer and that is why if I can find something to help speed up my workflow and make things easier I am all over it. That is why I use a few plugins (filters) to speed things up.
Nik Sharpener Pro 3
No more trying to work out radius, amount and threshold, NSP does all the thinking for me and works out the optimum amount of sharpening for my images. It is expensive and is a little slower than the sharpening tools in PS but it is definitely worth it for the great results.
Nik Define
Now I am shooting with the D3 noise is all but a thing of the past but I have a lot of images that were taken with earlier model cameras that still show signs of noise. To fix this I use Nik Dfine, it like NSP, scans the image and automatically applies noise reduction in various amounts to to different parts of the images as needed.
Nik Colour Efex
While wildlife photography is a pretty straight art landscape photography is pretty free range when it comes to image enhancements. I use Nik Colour Efex to add creative enhancements and effects. While not used on every image I do like a few of the filters offered in this package to add a little extra. My favourites are tonal contrast, bleach bypass and skylight.
While Photoshop and Lightroom are obvious choices hopefully this list has shown you a couple of other options to help share your photographic vision.
Read more...
Monday, 20 April 2009
This guy really needs a tripod!

Seriously, this thing weighs is at 16kg! He could always look here, here and here for more info on selection a tripod.
Read more...
Wednesday, 18 March 2009
Ten things you should always have in your camera bag
I have been out shooting landscapes for the last week in Sothern Victoria and had a great time with fantastic locations, great light and awesome weather. Came across a few problems during the week but nothing that wasn't overcome in the field with a few trusty extras that I keep in my camera bag so I thought I would write a list of some of the more important bits in the bag to help you out when in the field shooting and things aren't going all your way.
- A shower cap - I prefer the free ones that you get in hotels as they are A, cheaper and B, lighter. This is just the thing to throw over your whole rig when it is raining. You can even tear a hole in it to stuff your lens hood through to keep shooting in the rain.
- An Allen key (that fits your tripod plates etc) and a small screw driver, things get loose when bumping round in the back of the truck.
- A small cleaning kit including a blower and a lens cloth, very important when shooting at the beach and around waterfalls.
- Spare batteries, even though batteries are much better now than at the dawn of the digital age (three batteries for one shoot!) I still like to keep a spare with me even if it stays in the truck, I know it is there with some AAs for the flash too.
- Same goes for memory cards, even in the days of 8 and 16 Gig cards and dual slots I still like to keep a couple of extras with me just in case.
- A Neutral Density filter, doesn't take up much room and you never know when you will need it. Comes in handy when shooting watery landscapes.
- 10 meters off strong cord. Useful for tying off branches to get them out of the shot.
- A cloth in a plastic bag, handy for cleaning your hands when you have been getting down and dirty to get the right angle.
- A pen and paper. I use audio notations recorded with the image file a lot when a note relates to a specific image but sometimes it is handy to write stuff down be it a location to return to or a phone number.
- Some food and a drink, maybe it is just me but I don't function too well without food in me so I like to take a muesli bar or two with me in the field to keep the energy supplies up.
Read more...
Wednesday, 18 February 2009
Practice Makes Perfect- Learning and Remembering Photography Part II
A quick follow up from the last post about working out my lighting set-up for an upcoming shoot beforehand. The reason I spent the time working out the lighting a week before the shoot was because I had a preconceived idea how I wanted the light to look. I managed to work out how to get the light I was looking for beforehand so I can spend my time on Saturday fine tuning it, not working it out in the first place.
This also gave me time to process the images and have a look at how they will look after processing. A few things came out of the shoot apart from where to put the lights and what power to have them on. After processing them in Lightroom I was happy with the light but not totally happy with the finished product. So one change I will make for the weekend is to shoot them at 800 ISO. This will do two things, firstly it will conserve flash power as I will be using 3/4 less power each frame which will conserve batteries big time. Very important when working in the field using three SB units and four pocket wizards for a total of 22 AA batteries (I will take 20 fully charges spares too). But the main reason for the ISO bump is to get a grainer look to the images. I will even go to the extent of slightly over sharpening the images to give a edgier look to the files.
Another think I learnt was about my camera. I use flash a lot, mainly off camera in manual mode. I rarely need to use the AF illumination where the flash sends out a few beams of light to help with the auto focus but as this will be shot at night the AF illumination will come in handy but I found out (remembered) that it doesn't work in continuous servo AF mode, it has to be in single servo AF. This only took a minute to remember that but it was a minute of staring at my camera thinking 'What's up?' Doing this in front of your waiting model is not good form so chalk that one down for next time.
So if you have an important project and have the time it pays to practice. ( I used to practice changing film to keep my hand in the game for shooting action and not miss any frames!) This is just as important as keeping you eye in too.
Read more...
Sunday, 15 February 2009
Being prepared for photography
For those of you who are interested in the lighting set-up it is all shot using Nikon SB units. One shoot through umbrella with a SB-900, camera left, high, as a main light. Two Sb-800s with barn door gobos, either side of subject and she is holding a diffuser (not a reflector, the reflector bounced too much light) to fill in the shadows. This is shot after sunset at f9 1/250 to kill all ambient light and give a totally black background.
Read more...
Monday, 9 February 2009
Nikon still loking after its DX users

Many folk thought that Nikon would phase out DX bodies after the introduction of the FX sized sensor in the D3. Just released is the new 35mm AF-S DX f/1.8 Nikkor which should show that Nikon is fully supporting the continuation of the DX sized sensor and this should prove to be an awesome lens for DX shooters.
I was quite excited when I first heard of the 35mm f/1.8, I would love a fast AF-S lens around 35mm (28mm would be even better) but I missed the fact it was designed as a DX lens. As I am shooting only shooting FX format these days I miss out but it will be a great lens to have in the arsenel for those of you shooting DX cameras. I do have a project comeing up later this year that I am considering using a D90 as my main body and if I do then this little pupple will come along too.
It is definitely one of Nikons stranger looking optics looking more like an enlarger lens (do you remember what they look like?) than a wide angle lens for a SLR. Gone are both the aperture ring (G series) and the distance scale. This allows Nikon to save on price, weight and moving parts. When was the last time you looked at your distance scale anyway? The only time I use mine is when shooting landscapes and that is not what this lens is designed for.
Slated to ship at the beginning of March 2009, click here for more info AF-S DX Nikkor 35mm f/1.8G
Read more...
Tuesday, 3 February 2009
Top 10 Photography (related) Tools from 2008
2008 was a great year to be a photographer. Tonnes of new tools we released to make our lives easier and help us 'create' more. Here is my list of some of the most important things that happened in the world of photography to help us as photographers from last year. These aren't in any particular order just follow the link to see then and why I think they are so great.
- Nikon D3. This camera has opened up new worlds in photographic posibilities. Being able to create huge saleable images at 1600 ISO(I have made 1 meter gallery prints at 2000ISO!) is fantastic. Add to this the great auto focus cababilities of the camera, colour and contrast of the sensor and it all adds up to one of the greatest leaps in digital photography since the dawn of time.
- 14-24mm f2.8 Nikkor Lens. This on a D3 (or D700) is just amazing. When I first picked up the D3 with this lens attached I knew it was for me the wide view and superb sharpness across the zoom range (even at f2.8) is a fantastic effort from the lens makers at Nikon. Couple this with the huge viewfinder on the D3 and you will be hooked.
- Canon 5D MK2. A mid range camera that puts Canon's pro models to shame, bring it on.
- Photoshop CS4. I don't know how they do it but each time Adobe releases an upgrade to Photoshop it is worth the price to grab it. New navigation, upgraded adjustments (the sdjustment panel is great) better panaorama tools and overall improvements in speed all to make my time in front of the computer that little bit easier.
- Nikon D90. This has to be the best value for money around in digital camera. Not the cheepest but what you get for around $1500 is fantastic. 12MP, 5FPS (same as a D3x!) 3 inch LCD and movie mode! Possibly the best travel camera around.
- Intel Core i7 CPU. A strange one to the list but I recently upgraded my main desktop computer to an i7 based machine and the productivity increase has been fantastic. The processing power of this new computer saves me hours per week. Think about it, if you can save just 1 minute per image due to a faster computer then that adds up to hours saved per week which in turn adds up to days saved in front of the computer each month and with big files this new computer saves more than just one minute per file. This leads to less time in the office and more time for shooting which is after all what I love!
- Vista x64 (Service Pack 1). Yes you read it right, I love Vista. It got a really bad wrap at launch due to a number of issues that were all true that I won't go into here but if you are manipulating large files then 64 bit Vista is for you. The advantage of 64 bit (over normal 32 bit Windows) is that it can access more memory (RAM) which leads to faster processing in Photoshop. When stitching panorams Photoshop loves RAM and it flies with the 12GB available under Vista x64, my old 32 bit version would struggle with large panoramas often having to stitch them in multiple stages of even by hand! (x64 can access a maximum 128GB of RAM but I don't have quite that much, yet.)
- Nikon 24mm PC-E - I have been wanting a wide angle tilt shift lens for a long time. Canon has had their's for an age and when it came along in the form of the 24mm PC-E it was a dream come true. No more forgetting to manually stop down the aperture it dose it all automatically using electro magnets (E). Now that is clever.
- Lightroom 2(.2) Lightroom has been a big part of my workflow since it's creation a couple of years ago and the quick release of version 2 has introduced a bunch of features meaning I have to delve into Photoshop even less. Gradients, local adjustment brush and a bunch of other feature upgrades make it a defenate upgrade for all LR 1 users.
- Nikon SB-900 Speedlight. Nikon have always had a fantastic flash system and this has been added two recently with the SB-900, more powerfull, more inteligent and more customisable it is quite a big leap in technology over the 800. Unfortunatly it is a great deal larger too but that I can live with. (I kept my 800s for their smaller size!)
Sunday, 1 February 2009
Panorama and High Dynamic Range Workshop

After a number of requests recently we have decided to run a Panorama and HDR Photography Field Workshop. This Adelaide based trip in late March (Date TBC) will cover all the details of how to capture and process images for Panoramic and HDR shots. The day will begin with a photo-walk starting at the Festival Theater where we will learn about 'seeing' and 'designing' panoramic compositions.
We will wander the city street shooting, talking and learning all the finer details of how best to capture both panoramic and HDR images. During lunch we will concentrate on the computer side of the process, how to stitch panoramas to create various final outputs from straight panoramic images to polar panoramas (see below) and Flash and Quicktime VR movies.
We will also take this time to go through the process of HDR creation using Photoshop and Photomatix. The afternoon will again be spent shooting some more, creating panoramic and HDR images of the Adelaide City Streets and surrounding areas.
While we haven't finalized the details of the course yet we do expect the demand for to be high so if you are thinking that you may want to spend the day with us please get in contact workshops@craigingramphoto.com.au and we will put you on an no obligation first come first served wait list. More details to be confirmed later this week.
Happy Snapping!
Read more...
Thursday, 22 January 2009
How to Shoot Men in Lycra ( Tips for Shooting a Bike Race)
 I have been spending my time over the last week covering the Tour Down Under. It is an amazing event and has been superbly organised. Everything has gone like clock work so far and we're talking about one of those Swiss Precision time pieces here. Covering the event is gruelling and I'm just taking photos, don't know how hard it must be for those actually in the race!
In the past I have I have done my fair share of Mountain Biking photography but this is my first time coving a road race and boy is it different. I have learnt a lot since Sunday and I thought I would share a few tips with those of you who are in Adelaide and are thinking of heading out to capture the event or lookinag at trying you hand at shooting some road racing.
Read more...
Wednesday, 21 January 2009
D3 and D700 firmware updates
Nikon have posted updates for both the D3 and D700 camera. Nothing ground breaking here just some update, minor fixes and a spelling correction (?!?) Still nice to see they are still working on sorting us out when they can. More details after the jump... D3 The following improvements have been made in version 2.01 The following improvements have been made in version 1.01
D700
HI-, LO- has been changed to Hi, Lo
WARM TONE has been changed to WARM FILTER
COLOR CUSTOM has been changed to COLOR BALANCE
AF-S VR Micro-Nikkor 105mm f/2.8G IF-ED
AF VR Zoom-Nikkor 80-400mm f/4.5-5.6D ED
You can download the updates from here
And before you ask Manama is the capitol of Bahrain.
I am not going to update my cameras until next week as I don't want to take any chances as we have a busy week shooting the Tour Down Under. More to come on that one!
Happy Shooting.
Read more...
Tuesday, 20 January 2009
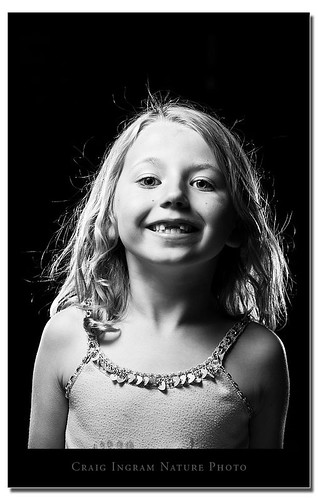
D3x, the results are in...

Well I managed to get my hands on a D3x for a short while and yes it is amazing. The files from that camera blow everything else I have seen away, compared with other DSLRs anyway. Actually the files are comparable with medium format digital backs and surpass both 35mm and 120 film that's for sure. Now I am not going to run an in depth review here. There are plenty of great detailed reviews around, what I am going to tell you is my opinion of the camera as a working photographer specialising in wildlife, nature and adventure sports photography in as few words as possible to help you decide what is best for your photography.
Firstly the D3x is based on the D3 body so its controls are the same, great from a workflow point of view. You can just get on with shooting as you have with the D3, that is if you didn't have to wait for the camera to crunch these huge files! After shooting with the awesomely fast D3 the D3x feels like it runs at glacial speed. A whopping 1.2 frames per second is slow even for my landscape work. I will write that out again so you know it isn't a typo, one point two frames per second! I have the buffer upgrade on both my D3s so it feels like I can shoot at 8 fps for ever but the D3x on the other hand, well you have to wait. This goes for downloading and processing the files too. My desktop machine can handle the files, (a quad core 3GHz machine running 8Gig of RAM) but my notebook (a 2 year old dual processor 2GHz Dell with 4Gig of RAM) well it dies. Lightroom, Photoshop and Capture all struggle keeping up and as I do a lot of processing while out on the road I would have to factor a new laptop into the purchase as well. Speaking of dollars how well does an RRP of $12,000 fit in? Well it is a lot of cash but not too much for such a camera that can holds its own against >$20,000 medium format backs. All the complaints about the D3x costing too much is just crazy. It is worth what people will pay for it and that is what Nikon are asking. I think Jaguars are expensive but I am not complaining I just won't rush out and buy an XJ8...
So Will I grab one? No. Not just yet. As a day to day camera I prefer the speed of the D3 over the file size of the x. The combination of the extra expense and the slower camera does not add up for me and my business. I do have a couple of projects coming up where the extra file size will be awesome but that is in the future and things and opinions do change.

And here is an example of the fantastic files this thing produces. Not my normal thing but check out the single hair in the left of the frame. Thjis is a 100% crop taken from the image below. And Little Miss Stubborn there has very fine hair! Awesome stuff. This is where I think this camera will excel, portraits and studio work where speed (fps) isn't critical.
And where to from here? How about and D700x? that sensor in a slightly smaller package would be awesome and I would drop 10 grand on that in an instant.
Read more...
Monday, 12 January 2009
High ISO in Flash Photography
It is great to have the option to crank up the ISO when the light is getting low and still get usable images at 800, 1600 and even 3200 ISO the the D3, but have you thought of using higher ISOs when shooting flash? Using higher ISOs allows us to shoot with a smaller aperture to increase depth of field which is a no brainer. But another great advantage is to using higher ISOs to reduce flash recycle times. This is especially important when shooting with small battery powered strobes like Nikon's SB units. This means we need less light for a correct exposure and we can therefore dial down the power of the flash unit. If it takes 1 second to recycle the flash at full power we can shoot at 1 frame per second to get a flash lit exposure. If we up the ISO by 2 stops we can reduce the flash power to 1/4 power allowing us to get more than 4 frames per second. (We get more than 4 frames per second because the flash is recharging as soon as the first frame has been fired.) In the above sequence shot at 1/250 sec f.5.6 at ISO 400 I managed to fire off 11 frames at 8 frames per second before the flashes ran out of juice. And that is without external power packs (SD-8a or SD-9.) Not bad for a strobe that can fit in your pants pocket!
